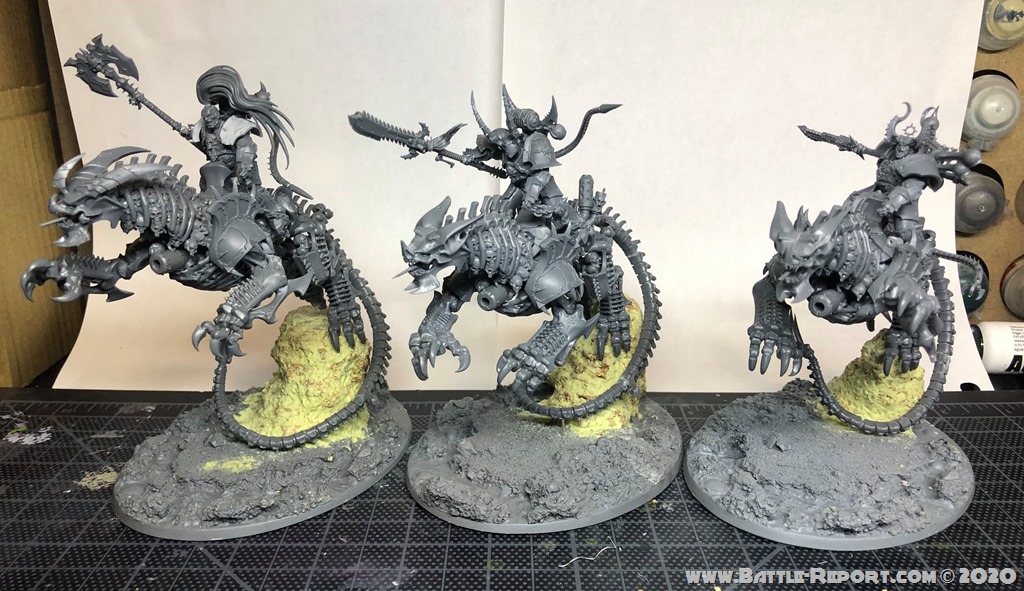
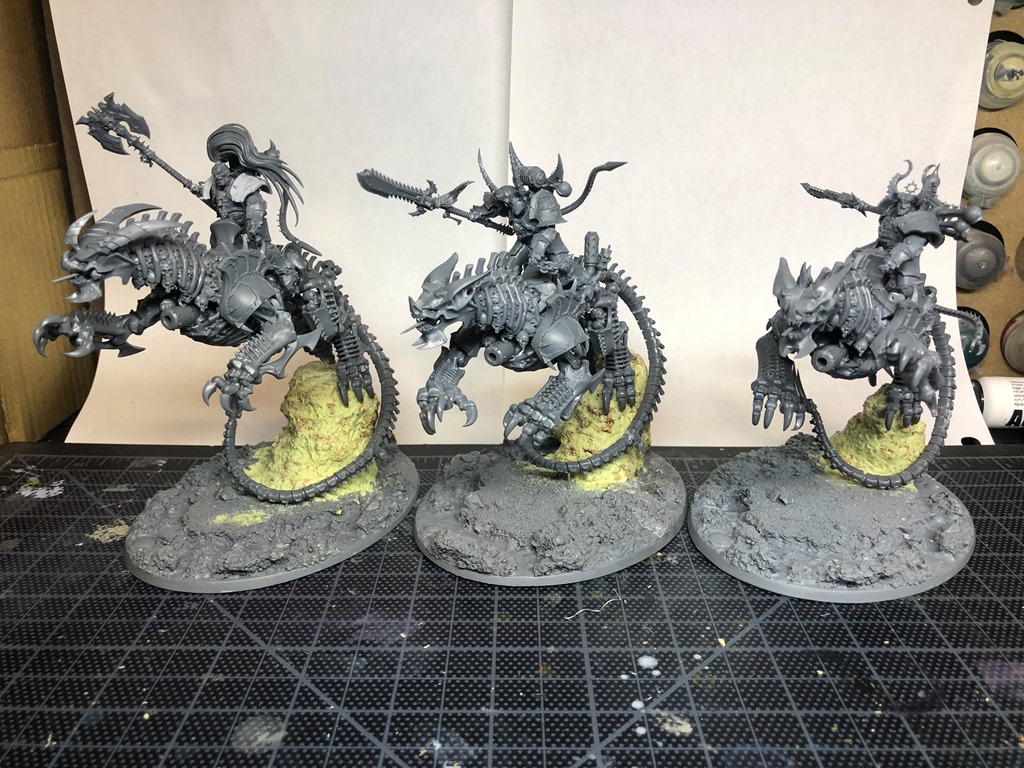
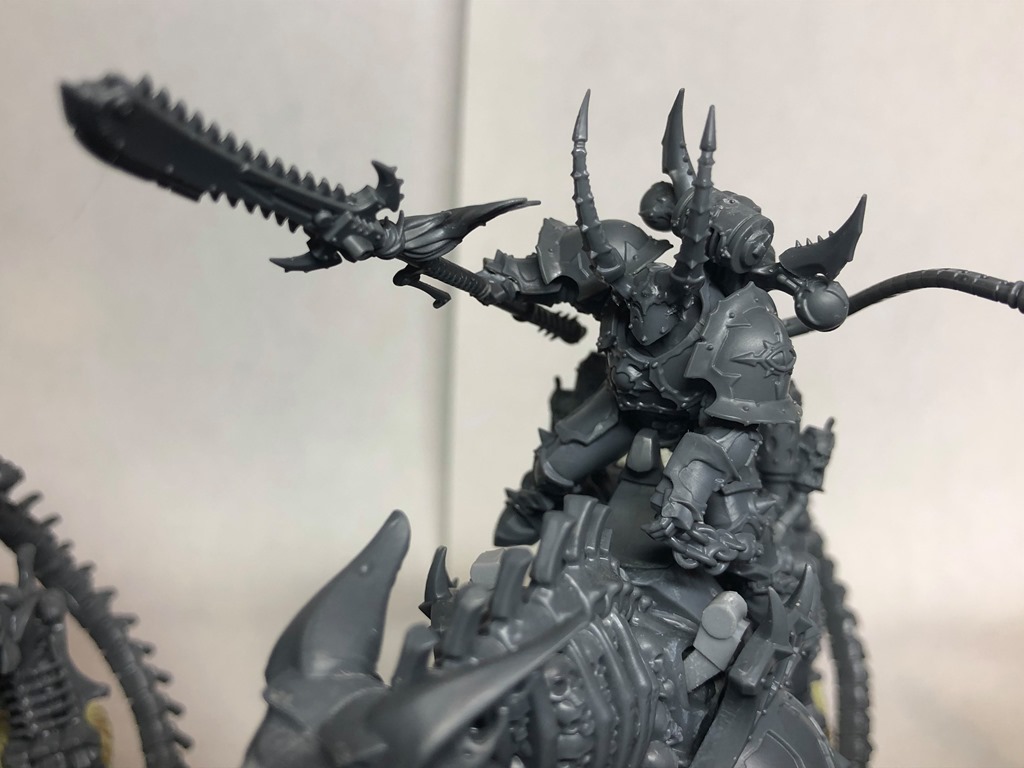
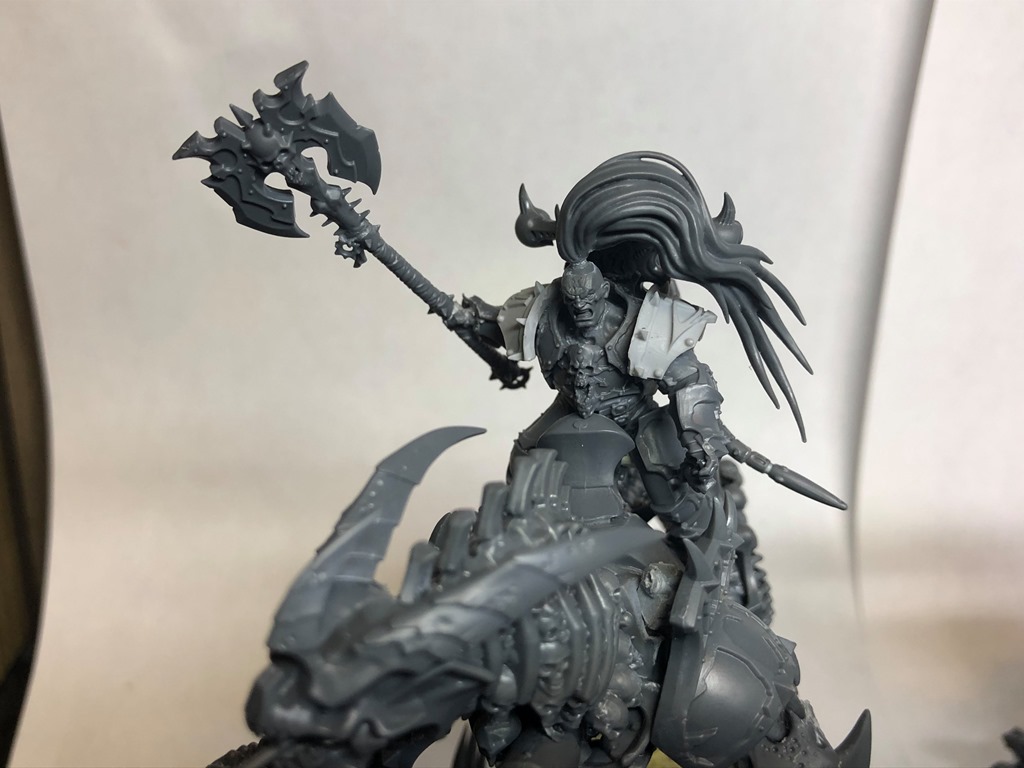
Slaanesh Lord Discordant riding a charging mechanical daemon-powered steed.
Bits:
AoS Mortarch steed
AoS Varanguard rider
Terminator or Varanguard Shoulder pads
40k CSM Raptor Chainsword
40k Forgefiend shoulder pad
40k Discolord tentacles and exhaust
40k Deathguard Cannon from PBC
40k Talos injector needle
Base: Resin, cork, pumice, glue
AoS Khorne blood warrior head (optional)
AoS Daughters of Khaine hair (optional)
Converting
The hardest part of the is entire project is lowering the large profile of the AoS Mortarch Steed down significantly, while also angling it to be more horizontally parallel to the ground. The goal is to simulate the steed leaping off the rock onto the ground as it chases after its target. While you can certainly skip this step but be advised the model and rider combined will stand WAYYYY too tall and some tournaments might not let you play with it.
Steed tail and legs
The first stage is the hardest and will drive you bonkers fussing with the alignment, but the effort and frustration is well it. So be patient and take your time. Cut off all the extra ghostly parts from the Mortarch steed’s spine and tail. Assemble the core body and full spine, leave off steed’s head and legs. (Hobby Tip: If you want to add LEDs to emit from the body, be sure to add them before assembling the body.)
Next, drill a pin into tail at the point at which the tail makes contact with the ground. Be sure to drill up the tail towards the body to best support to weight. Take a moment to strategically select five different points along the spinal column to cut, take out a spine or two, then pin back together, all while ensuring you can spiral the tail to continue the fluid “cork screw” appearance of the tail without being too jagged. Take too many spines pieces out of any one point and it looks too sharp of an angle and doesn’t flow right and looks pretty weird. I suggest taking from the following points; the spine first starts to separate from the body, about 5-6 spines down from that, another 5-6 spines down, about 4 spines right before where you pin, and then one or two spines after the pin. Take about 2-3 spines out towards the top of the tail and only 1-2 as you get closer to the tip of the tail to get the right amount of flow. Just be sure you are twisting the spine to look smooth as you position the pin. Next, add the feet to the model and pin the left foot at the palm as it will be leaping off the rock. You might need to cut off the toes and reposition them to be flush with the rock. Hard part done!
Base
At this point, you have to build up the base to meet the steed. The tail is not strong enough to support the weight of the model by itself, so the pin in the foot will help to take the weight off and bear the majority of the load. Take an oval base, build up some layers of cork in disk shapes so the bottom of the tail of flush with the ground and so foot can be attached to the top. You may have to cut down some of the cork to be sure that the rock is short and thin enough for the tail can go around it and curl in front. Try dry fitting multiple times. Once you have a cork spire high enough but thin enough to have the tail wrap around it, add a thin layer of pumice to the cork. This make it look like lava rock, while also adding strength to the cork and make it less vulnerable to dings and scratches while playing. I added some glue to the base to simulate lava flow. While not critical, a resin base adds weight to the bottom of the miniature and helps to keep it from tipping over once the steed is built with the rider. The model is very top heavy with thin anchor points, so be careful.
Steed Arms, Head, Saddle, and Weapons
Once the model is secured to the models’ base (or I recommend a large piece of wood/cork for easier painting), assembled the arms and pin into position to give a stretched out running appearance. Add the Forge fiend shoulder pads using Green stuff to secure it to the small Mortarch steed shoulders. Important, leaving enough space so the riders’ legs can fit between the body and shoulder pads. Attach the Varanguard stead’s chest armor to the bottom of the stead. Shave down the spikes on the thighs and add Chaos Deamon Prince armor to the lower legs. Add the death guard PBC cannon coming out of the chest. The cannons generic shape allows it to be used as either an autocannon or baleflamer (make sure you are very clear with your opponent about which it is). For the saddle, make sure you reverse it and cut it down so the rider fits not too high. Be sure to place the top saddle as far back on the bottom saddle as you can to help save height. This step takes a little trial-and-error to make it work. For the exhaust, I used a few different bits (Discolord exhaust, leg piston from a GK Dreadknight, Chaos Wardog Exhaust, etc.) and all fit well after some trimming and green stuff. For the head, cut down a Dark Elder Talos injector and attach it from beyond coming out from inside the mouth. Attach head to body. Boom! The steed is done. Go have a beer.
Discolord
Build the Aos Varanguard rider legs and torso. Be sure not to attach him to the steed until you’re done painting but ensure they can rest on the saddle and legs fit between the steed and shoulder pads. Use green stuff to build up the saddle if you have to make it fits snug. Drill a hole into the left hand holding the steed so you can add chain. To attach a thin piece of chain to the rider’s hand. For the connection point to the steed, you can use anything. I drilled a hole into a resin dreadnought finger I had laying around and attached it to the steed’s anchor point (you’ll know what I mean once you see the model). I used chain from Green Stuff World but you can use any generic chain. Discolord chainglave is made by pinning the Varanguard spear and CSM Raptor chainsword together. Add either the Varanguard shoulder pads or some Forgeworld terminator shoulder pads to add bulk. Using the Greater Possessed backpack as a base, attach a Discolord tentacle to it and attach to the rider. Use some green stuff to ensure it’s a good fit. The head was made by pinning AoS Melusai hair and Khorne Blood head. Be sure to file down the Mark of Khorne symbol on his forehead first. The rider is now complete. Maybe add some elaborate greenstuff trim to the armor or add plasticard pipes to the backpack to simulate an music windpipe (see my Noise Marines) if you are feeling extra excessive!
Painting
So now you have the base, the steed (attached to a large piece of cork or wood), and the rider (pinned to a small cork) all separate and sanded down to be Slaanesh smooth. Now you’re ready for painting. Alternatively, you could fully attach the steed to the base and still be find painting it, just annoying to work around.
Color theory
Flawless Host follow the chaos god of Slaanesh and their color scheme is “suppose” to be dark purple and beige, which I’m not a huge fan of. I wanted to capture the clean Slaanesh look but also show the wear and tear of a deamon engine steed. So I decided to go all Slaanesh heavy metal and paint the steed purple metallic skeleton and glowing skulls. To contrast with the purple, I painted two with turquoise skulls. If you want to go complementally, paint the glowing skulls magenta/pink. The armor would be black, which pairs nicely with the purple toned metallics.
Skulls
*big sigh* I can’t stress this point enough… paint the darn glowing skulls first! After that, go back and cut in the metal skeleton. After doing three of these big boys, my biggest regret is not doing the skulls first. You can certainly airbrush everything metal to get a head start and then start on the skulls but don’t try to protect the metals parts at any point. Allow them to get messy if needed because you will be coming back and cutting back in the metal anyways.
Turquoise skulls: Precision airbrush white on the skulls, followed by Sotek Green, Diluted Coelia Green shade/wash, light drybrush of Vallejo Turquoise, light drybrush Temple Guard Blue, then Baharroth Blue edge highlight with a brush. Add white to the mix for final highlight.
Magenta skulls: Precision airbrush white on skills, followed by Warlock Purple, diluted purple wash, drybrush Warlock Purple, then add pink to the mix to get the final highlight with a brush. Be careful not to go too pink. Vallejo Fluorescent Pink works great under a white undercoat as well.
Metallics
The metallic on the steed and trim on the rider’s armor are the same. This step will take the longest but so worth the effort. Cut in all the metals with a base coat of Vallejo Air Boltgun Metal Mixed with Vallejo Air Silver (2:1 ratio). Wash with a slightly diluted Army Painter purple wash with ARMY PAINTER QUICKSHADE WASHING MEDIUM (2:1 ratio). Purple adds the darkness while contrasting very well with the turquoise skulls. Pick one section to wash at a time allowing it to dry before going to the next, this help to avoid pooling. While applying, use a water soaked brush to wick away any wash in areas you don’t want it to be or pooling too much. You also want to avoid the glowing skulls, so be very careful. Quickshade really helps with control at this point.
Pro Hobby Tip: Quickshade washing medium is my personal not-so-secret sauce to painting surface areas. It gives you much more control because it thickens the wash slightly for better handling and helps with “pushing” the wash around the model to ensure you place it where you want it. It also helps speed up the drying time and creates a super smooth transition as it falls into the crevices (which helps to avoid ugly coffee stains if you just apply a wash directly). Pick up 5 bottles of that stuff when you see them in your local hobby store and you will thank yourself later (Disclaimer: I am by no way supported by Army painter and their paints are not the best but their wash-game is just the best the in business.)
Next, very lightly drybrush Vallejo Air Silver Metal onto the surface to re-establish the metal look on the edges. Be very careful avoid the nice skulls you painted. Optional, at this point you can add a thin glaze of the color you used for the skills on to the metal armor to get an OSL effect. Then add a very very very very light drybrush of Vallejo Metal Air Silver mixed with a bit of Aluminum to really make the edges pop but not be too overpowering.
The part that will make you money is the final line highlight of Vallejo Air Aluminum metal. To represent scratches in the armor, make some very small perpendicular scratches along the edge to add texture. This does two things, it provides a very strong edge highlight and goes a long way to showing off weathering. Take your time with this stage.
Black armor
Airbrush the rider and the steed’s armor plating was painted first with Citadel Black, then airbrushed with Vallejo Dark Sea Blue, then P3 Gravedigger Denim for highlights. Seal with a varnish to protect it, allowing it to dry overnight. Wash with Army Painter Dark Tone. Line highlight armor panels with gravedigger denim.
Leather straps were painted with Scale 75 Black Leather. Dark brown and black would also work fine. The hair was painted with Vallejo Violet, then Citadel Warlock Purple, then Fluro Magenta to the tips of the air.
Painting the lava base is a whole separate series but you should be really proud if you’d reached this point. Attach the steed to the base, then the rider to the steed, and your all set. Cheers!
A bit of an update as I’m building the army for the 2020 ITC season. I wanted to go through my decision-making process with how I decided on the basing/ basic conversion work. I also wanted to discuss how I’ll be proceeding moving forward with the Blood Ravens army for 2020.
Learning from the Past:
One of the tendencies that I have had with working on Warhammer armies is to build and paint units individually. This was a good way to slowly build up and army from the hobby perspective, but it always left me scrambling to learn how to play the army when I finally took it out to tournaments and local events. I started to break with this tradition last year with my Custodes, bringing an incomplete army to two GTs. However, the lack of practice prior to these two events meant that I was never going to do well when it came time to roll dice. This year I’m going to attempt to fix this trend and try to score better with battle points. As a result, I’m focusing on building the entire army up front, so that I can begin practicing with the force ASAP. I’ll paint the army slowly, but getting them on the table for local events means that I get to practice.
Before building the army, I had to design a list. Thankfully a friend of mine was able to lend me his tried and tested Iron Hands list. This will give me a great starting point to work from as I move forward in the 2020 season.
Battalion Detachment: Iron Hands
HQ:
Iron Father Feirros
Primarus Libarian (Blessings of the Machine God, Psysteel Armor, Reforge, Force Sword, Tome of Malcador)
Troops:
Intercessor Squad x5
Intercessor Squad x5 with Auxilary Grenade Launcher
Intercessor Squad x6 with Auxillary Grenade Launcher
Elites:
Invictor Warsuit with Twin Ironhail Autocannon
Invictor Warsuit with Twin Ironhail Autocannon
Heavy Support:
Thunderfire Cannon with Techmarine
Thunderfire Cannon with Techmarine
Spearhead Detachment: Iron Hands
HQ:
Primarus Lieutenant
Heavy Support:
Relic Leviathan Dreadnought with 2x Storm Cannon Array and 2x Heavy Flamers
Repulsor Executioner with Heavy Laser Destroyer & Ironhail Heavy Stubber & Icarus Rocket Pod
Repulsor Executioner with Heavy Laser Destroyer & Ironhail Heavy Stubber & Icarus Rocket Pod
2000/ 2000 points
Progress So Far:
Theme:
With the theme of the army set as Blood Ravens, I figured that I would lean in heavily and add some features from the Dawn of War games. I added back banners to all of my sergeants (without helmets of course) just like they were featured in the Dawn of War original game. I also converted my Primarus Lt. to look like sergeant Tarkus (one of the characters of the DoW II campaign). I remembered that the Space Marines in the DoW III game had chains and other small details added onto the models. I really liked this concept and I decided to add it onto the models as well, adding chains on shoulder pads as well as on the different weapons.
Conversion Work:
In my previous armies I have completely scratch built and added a lot of detail to models to make them fit a specific aesthetic or theme. With this force, I’m straying away from that a little bit, only adding some minor conversion work and bits swaps to the infantry. I’ll be looking to do some larger conversion work though with the vehicles (extra armor, different weapons, etc…) and the Thunderfire Cannons (complete scratch builds) though. The Primarus models are extremely well designed and I just don’t see a need to do massive conversion work to match the Blood Ravens style.
3rd Party & 3D Printing:
I’m concerned about using 3D printed and 3rd party materials on this army. One of the things that I would like to do is to enter this army at the local GW store for the Armies on Parade. I know that in the past GW has been pretty strict concerning the use of non-GW bits. For the moment I’m thinking of just playing it safe and working on freehand/ scratch building parts myself.
Basing:
I’m adding cork board to the bases, before throwing pieces of plastic card on top. For some of the bases with enough room I’m also adding in GW skulls and other pieces of debris. In the past I went a bit overboard when it came to my bases, adding in freehand and other details. With this army, I’m thinking of adding a checker-board pattern, but painted in neutral color so it won’t overpower the individual units.
I took three Iron Warriors Khorne Lord of Skulls to the Las Vegas Open.
And I had the time of my life. I played against 6 highly skilled opponents, each at or above the caliber where I'd expect they easily win a local tournament. Every game was exciting and it never was over on turn 1, which is sometimes the case right now in competitive Warhammer 40k.
Update: Placed 2nd at CaptainCon GT
Will do a quick summary of that GT if there’s interest. Took alpha legion instead.
Terms Used
LOS: Lord of Skulls. A Chaos Space Marine Titanic Khorne Daemon Engine Vehicle. Visually, it’s the upper body of a knight on a landraider-sized chassis. It's a 28 wound monstrosity with a 3++/5++ (even in combat), healing a wound a turn. Key Stratagem: Daemonforge, 1CP. "Reroll all failed hits and wounds for a daemon engine in the fight or shooting phase."
MOP: Chaos Space Marine Master of Possession. Most critical unit in my list: provides two psychic 6" aura abilities that buff the LOS and all Iron Warriors Daemons to having a 4++ and a reroll 1s to hit and wound
Brims: Brimstone daemons, a Daemon troop choice. Very efficient 3pt troops who have a 6++ and a few tricks up their sleeves: the ability to cast and deny on one dice, deep strike, and take blue horrors as a 2pt upgrade -- the blue horror can split into a brim when it dies (as long as your list has 3 points left over to cover the cost of the 3pt reinforcement).
Disco: Lord Discordant. A Chaos Space Marines Warpsmith Daemon Engine Vehicle Character. Double-buffer to the Lord of Skulls: +1 to hit aura, and +2 to Movement aura if I chose to spend the Field Commander Stratagem for 1CP.
Why do this?
After their 100+ point drop in Chapter Approved, I took a look at the LOS again. I asked on reddit (/r/WarhammerCompetitive) what people thought of its value and I got thoughtful answers and tips. I brought one LOS to Goldensprue and liked it (that's a whole other story), so I put in more. One thing I liked about the LOS is that unlike knights it has this big heavy grimdark tank tread body. Which conveniently blocks line of sight to stuff behind, even occasionally lord discordants, but mostly its buffing characters. Additionally, the new Iron Warriors Vehicles Strats improve the LOS both offensively and defensively, and it gets buffed by MOP, Disco, the Daemonsmith (Iron warriors warlord trait for all Iron Warriors Daemon Engines with 6" to score an extra hit on an unmodified roll of a 6 to hit), as well as the Crimson Crown which i put on the Daemons HQ Bloodmaster (Khorne Daemons relic: all Khorne Daemons within 6" score an extra attack on a 6+ to wound). A final reason to take this list is that it's relatively straightforward: I'll know how well I'm doing by how many LOS are left alive. And my list will be a wildcard that few people will have practiced against, because the list was 2600+ points before December's Chapter Approved.
First Day: My LVO started out really well on Thursday, before the tournament, with a masterclass from Glasshammer Gaming's Mani Cheema. A dozen of us sat around a table and chatted for over 2 hours about all aspects of the game. Mani's advice: if the opponent won't break your back on their first turn, give it to them (so of course Mani brought a list that can break backs on his first turn lol). Also, I learned a few critical things: abilities that allow unmodified 6s to hit to generate an extra hit, aka “explode”, works even if there are enough minuses stacked to mean you can't hit: imperial fists shooting at -4 to hit Discos will still get a hit when they roll a 6 with 3+ BS. This learning would also apply to my list, as it applies to Daemonsmith. Also, I learned you can move over enemy models with fly when you heroically intervene, pile in or consolidate.
General strategy for the event: Hide characters and even sometimes the disco behind LOS, keep the 2 red LOS towards the back of the board and shoot things at 48 inch range. Keep most of my units, except for one aggressive LOS, the one painted white, castled up within 6inch aura buffs. Around turn 3 or 4, if I correctly kill enough alpha targets, any LOS will be unkillable (due to lack of enemy anti-tank) and I can go into a god-mode breakaway with it up the board, helped by a warptime.
List Strategy: I chose to not take the gatling gun on one of the LOS (which is the best and obvious choice at 30pts more) so that I could take a double battalion and a mix of buffing characters. The general idea is to place that white, weaker-at-shooting LOS on the frontline as the "threat they can't ignore". This forces the opponent to come out of their hole and engage this juicy target, which I consider a decoy. On my turn, with that LOS dead, I'll be able to move my two remaining red LOS out of the backfield and shoot his targets that got exposed to kill the first LOS.
I took a double battalion for the CP, mostly so that I would have many options to deal with a variety of threats. This proved to be a mistake: my cultists gave away too many kill points to the opponents. But I think it's part of the learnings that come with attending my first LVO, and also being in this blind corner moment in the meta.
Thank you to Goonhammer's Review for making it so clear to see the pros and cons of the different new rules from Faith & Fury, which led me to choose Iron Warriors (but maybe I should have chosen alpha legion for the re-deploy 3 units warlord trait!)
Going first (opponent's choice) on Spearhead Assault (pointy hammer).
Game 1 LOS Survival Tally:
I'll use the following table to answer the following critical metric in each of my games: how many LOS are still alive after the Top and Bottom of each turn?
LOS alive on:
Top
Bottom
How did I lose it?
Turn 1
3
2
Possessed charge
Turn 2
2
1
Obliterators took off 52 wounds
Turn 3
1
0
Terminator Sorceror super-smite
Opponent's List: [expand title="Possessed Bomb (click to view)"]
+ Battalion Detachment +5CP (Chaos - Chaos Space Marines) [85 PL, 3CP, 1,306pts] ++

+ No Force Org Slot [1 PL, 3CP, 10pts] +

Dark Disciples [1 PL, 10pts]: 2x Dark Disciple [10pts]

Detachment CP [5CP]

Field Commander [-1CP]

Legion: Alpha Legion

Specialist Detachment [-1CP]: Daemonkin Ritualists [-1CP]

+ HQ [16 PL, 255pts] +

Chaos Lord with Jump Pack [6 PL, 95pts]: Chainsword, Combi-bolter [2pts], Mark of Khorne

Dark Apostle [5 PL, 72pts]: Mark of Slaanesh

Master of Possession [5 PL, 88pts]: Force stave [8pts], Mark of Slaanesh, Shepherd of the True Faith

+ Troops [12 PL, 165pts] +

Chaos Space Marines [4 PL, 55pts]: Mark of Khorne
. Aspiring Champion [11pts]: Bolt pistol, Chainsword
. 4x Marine w/ Chainsword [44pts]

Chaos Space Marines [4 PL, 55pts]: Mark of Khorne
. Aspiring Champion [11pts]: Bolt pistol, Chainsword
. 4x Marine w/ Chainsword [44pts]

Chaos Space Marines [4 PL, 55pts]: Mark of Khorne
. Aspiring Champion [11pts]: Bolt pistol, Chainsword
. 4x Marine w/ Chainsword [44pts]

+ Elites [20 PL, 306pts] +

Possessed [20 PL, 306pts]: Mark of Nurgle, 18x Possessed [306pts]

+ Heavy Support [36 PL, 570pts] +

Obliterators [18 PL, 285pts]: Mark of Slaanesh, 3x Obliterator [18 PL, 285pts]

Obliterators [18 PL, 285pts]: Mark of Slaanesh, 3x Obliterator [18 PL, 285pts]

++ Battalion Detachment +5CP (Chaos - Daemons) [26 PL, 5CP, 356pts] ++

+ No Force Org Slot [5CP] +

Chaos Allegiance: Nurgle

Detachment CP [5CP]

+ HQ [8 PL, 140pts] +

Poxbringer [4 PL, 70pts]

Poxbringer [4 PL, 70pts]

+ Troops [18 PL, 216pts] +

Nurglings [6 PL, 72pts]: 4x Nurgling Swarms [72pts]

Nurglings [6 PL, 72pts]: 4x Nurgling Swarms [72pts]

Nurglings [6 PL, 72pts]: 4x Nurgling Swarms [72pts]

++ Battalion Detachment +5CP (Chaos - Thousand Sons) [25 PL, 8CP, 332pts] ++

+ No Force Org Slot [8CP] +

Battle-forged CP [3CP]

Detachment CP [5CP]

Legion: Word Bearers

+ HQ [13 PL, 204pts] +

Chaos Lord with Jump Pack [6 PL, 94pts]: Bolt pistol, Chainaxe [1pts], Mark of Khorne

Sorcerer in Terminator Armour [7 PL, 110pts]: Combi-bolter [2pts], Force sword [8pts],
Mark of Slaanesh, Warlord

+ Troops [12 PL, 128pts] +

Chaos Cultists [6 PL, 48pts]
. 11x Chaos Cultist w/ Autogun [44pts]
. Cultist Champion [4pts]: Autogun

Chaos Cultists [3 PL, 40pts]
. 9x Chaos Cultist w/ Autogun [36pts]
. Cultist Champion [4pts]: Autogun

Chaos Cultists [3 PL, 40pts]
. 9x Chaos Cultist w/ Autogun [36pts]
. Cultist Champion [4pts]: Autogun

++ Total: [136 PL, 16CP, 1,994pts] ++ [/expand]
Game 1 Strategy: Go first and hold the middle, where there's a magic box (i.e. enclosed ruin). His army is all infantry: no daemon princes, which is a smart move for the Magic-Box heavy LVO. My list has 300 points of infantry. If there are infantry knife fights in the ruins, it won't be a fair fight: I'll lose. It's mission 1, so there are 6 objectives, and there are a total of 5 Magic Boxes on the table. I got to get him to come out and play in the open. I also knew from doing some math beforehand that I would lose a LOS to the possessed if they charged it, but I could wipe the possessed unit with a LOS with shooting + charge. It was a trade I was willing to do. Secondaries: Recon, Engineers, Butcher's Bill.
MVP: the Lord of skulls on the counter-charge turn 2 into the possessed. He was out of range of the Daemonsmith daemon prince (who I sent to assassinate the opponent's MOP), yet he still did the business, thanks to the 6 mortal wounds my first LOS did to the possessed when he exploded after dying to them in combat. After this charge, and the whole possessed squad dying, my opponent starts packing up his cards. “That was my whole list” he says. I start feeling elated. Mistake! LVP: The Master of Possession was the least valuable player. Turn 1: casts Cursed Earth, I rolled two 1s. I re-rolled a 1 into a 1 with a CP and the opponent pops the daemon double-D3 mortal wounds perils stratagem, Daemonic Possession. I roll 4 mortal wounds, and can't re-roll cause I used the re-roll on the double 1 from the perils. I've lost my master of possession to perils at the beginning of my first psychic phase round 1of the LVO. lol. My Master of Possession has died to Daemonic Possession. Fitting?? Opponent's MVP: Obliterators taking 52 wounds off of 2 Lord of skulls the turn they dropped in. That stunned me. I had recently been listening to an Art of War podcast with Mark Perry, and Nick was saying Obliterators did "Nothing" to "Definitely Nothing". Well these swingy obliterators here just won the game by taking out nearly all the wounds off my two remaining LOS.
Photos:
End of Top Turn 1
Alternate view of turn 1
My movement phase top of turn 2: seeing how to fly over and get his MOP
Path to Victory: He clearly and definitively won the game: 26 to 23. Luck was more or less on my side and it still didn't work. I think my lack of practice really hurt me here: I didn't know how to time the possessed bomb. I probably could have played less aggressively: I got unnerved by the fact that 5 objectives were holdable from within Magic Boxes or back-corner ruins, and he had a completely infantry army, and so I decided to take the first turn and rush up into possessed charge range. If there wasn't a magic box in the middle, I would probably have chosen to go second. Also, forgetting my brims in deepstrike was a mistake (you will see a trend here). I could have maybe used them to screen the LOS and protect him from the Super-smite (but i doubt it, cause I think they were less than 9 inches away from each other). I could maybe have held another objective for one turn, but it probably wouldn't have swung the game on its own. One path to victory would be having the MOP alive to give the LOS all 4++ : they died faster than expected with 5++s. Practice, Practice, practice. Memorable moments: my opponent being so good that he suggested to me a brilliant strategy that he assumed I was doing but I hadn't thought of: charge the cultists into the remaining single nurgling, but move them in a wide circle around it, only hit in the fight phase with 2 of the cultists to guarantee you won't take the last 3 wounds off the nurglings, and then trap that nurgling with just enough space to fit a LOS into being within 1" of the nurgling on its consolidate: Now the LOS is untargetable in the enemy shooting phase. Well, it didn't matter that I didn't think of the play, because he killed the final LOS with Smites alone!
Deep Strike Arrival of all Crimson Hunter Exarchs + Falcon + War Walkers and Doom
Turn 3
2
2
He targets the Disco instead, takes decoy LOS down to 4 wounds
Turn 4
2
1
Decoy LOS destroys Falcon in charge, then dies
Turn 5
1
1
Final LOS is in god-mode: 2 CHEs left
Turn 6
1
1
1 CHE left, main threat left on the board
Strategy: If I can choose, go first and hold the middle, where there's a magic box. Night Spinners are top target priority because my infantry is weak. It's only 3 objectives, so if I can hold the middle I can hold more, and if I do that I have the game. Secondaries: Recon, Engineers, Big Game Hunter. Summary: I kill half his on-table army turn 1: all that's left is a loaded Wave Serpent and an autarch that I can't get line of sight onto. The 12inch move on the LOS was beneficial for getting them into line of sight (thanks to Soulforged Pact). Turn 3 was memorable: I didn't get a kill!!! I failed charges with the Disco and the LOS, and had split fire into the eldar fliers, which was a mistake (also, he didn't kill my decoy LOS first: he went straight for the better gun). I wasn't too worried: I had amazing board control -- lots of infantry in the central magic box surrounded by all LOS --and forced him to arrive from deep strike far from my engineers and had already killed the 3 night spinners: I was gonna max engineers and was looking at hold more for every turn. But I did start to get worried when I lost the first LOS, Daemon Prince, and especially Disco and the 2nd LOS. Where I got lucky: Opponent didn't have anywhere to hide his 3 night spinners. He did manage to hide a wave serpent behind a hill, but once I moved the 3 LOS into the center, I had line of sight onto all 3 night spinners, and thanks to both the Daemonforge and the Tank Hunters Strat I got all 3 night spinners on the first turn, putting one LOS into each. Where he got lucky: double 6s on damage from one war walker into Disco (he has 13 wounds total because of insidium, an iron warriors relic for +1 S, +1 T, +1 W). This single incident turn 2 fundamentally changed the Disco's lifepath. He could have taken 10 wounds and loved it and been a complete weapon for me the rest of the game. Here's why: At 1 wound remaining, even when he heals 1 at the beginning of the turn and then I spend my second to last CP to heal him for 3 wounds (Iron Warriors strat Unholy Vigour), he's still in not in top bracket. But he would have gotten into top bracket if he had only taken 10 wounds, which meant that he would have made the 4 inch charge into the falcon, instead of failing the 7 inch charge. If he had made the charge, he was likely to have killed the falcon, at which point he could have used his own discordance to heal himself for D3. If the opponent had only rolled 7 wounds, the average, I wouldn't even have needed to use a strat to heal him to put him on top -bracket, and I'd have had 1 CP left to either guarantee the 4inch charge or to use Daemonforge in the fight phase to guarantee the kill with the Disco. That war walker's 12 damage sealed his fate.
End of Top of Turn 1
The flyers arrive
End of game: all objectives are mine
Path to Victory: This was the most straightforward win, at 34 points, of my LVO. Mission 2 of ITC is notoriously good for Chaos, especially if you have turn 1 and there's a magic box in the middle. Kudos to my opponent for putting me on my back foot nonetheless once he arrived from deep strike bottom of turn 2. LVP: Unwounded Daemon Prince charges autarch, does 2 wounds to him, gets stabbed to death by said autarch over the next two rounds of combat (I was shocked when the autarch stayed in combat, Doom goes off from a farseer who survived a round of combar with a LOS). My Disco won second place for LVP: he advanced and I use my last CP to allow him to advance and charge (Soulforged Pact Stratagem) and he fails a 7inch charge and dies to shuriken. MVP: Bloodmaster of Khorne charges the daemon-slayer hero autarch surrounded by cultists and takes his pound of flesh turn 5. Does more damage than the daemon prince, even rolling 2 6s to wound which is flat 3 damage and an extra attack because the Crimson Crown affects himself as well. Memorable moment: On my turn 2 I needed to get line of sight on some dark reapers, and I got approval from a judge that Containers count as hills and that vehicles can climb hills, so this happened. Shenanigans! Can’t say I’m proud of it.
Game 3: Imperial Fists
Going second (opponent's choice) on Hammer and Anvil
Whirlwind & Scorpius, lascannon chaplain dread, stalker intercessors (imperial fists!) and Devastator Gravs kill decoy LOS & hidden Disco
Turn 2
2
2
One LOS picks up devastators in combat, tags the droppod (on my backline), and the other LOS hides outside of 60inch range
Turn 3
2
2
With my LOS outside of 60inches, he instead picks up my entire army bar the Daemonsmith
Turn 4
2
1
I had brought the 2 LOS forward: it was time to breakaway. 1 dies.
Turn 5
1
1
Last LOS is in godmode after killing the Scorpius
Turn 6
1
1
Hold more & Kill more achieved
Summary: I should start by saying that round 3 was many people's least favorite game they had at the LVO. Due to technical difficulties, this round started 2 hours late. People were lying under tables napping from exhaustion. Many people were cranky, I probably was, and I played faster than I should have mostly from wanting to go to sleep. The LVO generously offered to have us play at 7am instead, but I figured I might have been just as tired then, and the idea playing 4 rounds in one day seemed intense.
How'd it go? I lost the hidden disco and a LOS on his turn 1. The opponent dropped the droppod down turn 1 to eliminate my frontline LOS, but was smart and placed the droppod in the back of my deployment zone, which meant it gave me no extra movement if I wanted to come at him. I spent my first three turns keeping my surviving 2 LOS outside of range of the Relic Scorpius, shooting intercessors and scouts and the Mortis Dreadnought that moved up with its 36-inch range heavy bolters. I then moved both LOS up, lost one, but then finally the last surviving LOS got within its guns' 48-inch range of the relic scorpius and Daemonforge guaranteed it was gone, and the LOS went on a god-mode breakaway.
Strategy: Going into the event, I knew imperial fists would potentially be a tough matchup for me: heavy weapons do an additional point of damage against vehicles. My army is mostly vehicles. And then there's the Relic Scorpius. This relic is scary: it has 6D3 shots (when it doesn't move) re-rolling all hits with a chapter master, re-rolling wounds of 1 with Eye of Hypnoth, with +1 to wound with from both an imperial fists strat and a chaplain litany, and 3 damage. The deployment favored me: My LOS range was 48 with a 10 inch move, his was mostly 36, and we were on hammer and anvil. I could put the LOS out of range of most of his army at over 48, and then move into range when I felt like the time had come to go on a breakaway. The terrain favored me: the hill in front of his army was only high enough to hide infantry, not tanks. His artillery had nowhere to hide. 4 Objectives were all in the open so I could shoot things off objectives when I needed to get hold more. Still, I was scared enough of the opponent's artillery that I wanted first turn to start clearing him out, but he got first turn.
Biggest misplay: I chose recon and engineers as secondaries, because, I think, they had worked very well for me in the first rounds. I scored 0 points for either. If I had chosen anything else (old school, reaper, ground control), it would have been a victory. Misplay from the opponent: He told me that his Relic Scorpius, which could reliably take 20 wounds a turn off a LOS, had a 60inch range. I found out the next day when I faced another Relic Scorpius player that it has a 48inch range. I kept 2 LOS out of 60 inches of the scorpius for 2 turns, losing my support characters to the Relic Scorpius (I didn't bring them far enough back to be protected by the LOS), my Disco to the Scorpius, all in the 48-60 inch range. I've played a lot of 40k, and I know that often it's easy to get your rules wrong . I'd already lost a game before anyway, so I was at LVO to have fun. Really, I'd say, to Games Workshop: slow down with all the new rules all the time or you're gonna have an edition that gets too bloated again and its hard to remember everything. Path to Victory: It was a 1 points loss: I had tabled him except for 1 support character by turn 6 with a LOS still alive. 19 to 20. There were so many paths to victory that I almost don't want to think about it: I had 5 more points than him on primaries, but lost 10 to 4 on secondaries. Most obvious was engineers. I guess I just wasn't thinking, and this is a thinking person's game. Learning: You need reps with your LVO army. You need practice in selecting secondaries, knowing the range of enemy guns (The Relic Scorpius was common enough), and in timing your breakaway, so that if you're not thinking you can go on auto-pilot. And Mission 3, especially against artillery, is just bad for engineers.
Just on Tuesday with my teammates I had practiced against a similar list, the triple deepsrtiking Raven Guard centurion list as played by Alex Fennell at Goldensprue GT. My plan was simple: bait him into charging the decoy LOS, tank a lot of wounds with the 4/5++ and the 6+++, and survive on the lowest bracket to then interrupt with an ungodly number of attacks. If the LOS does die (he could, if he's already taken a few wounds, tho I have the slaanesh herald for the Aura of Acquiescence strat to reduce their attacks by 1), you can always kill the Cents with a counter charge while the shooting picks up the Devastator Cents. Really, what I was afraid of was the opponent hiding the whole game, so I took ground control and Recon as secondaries (as well as gangbusters ) to not be too dependent on having to kill things to win. In this case, he came out of hiding: at the end of turn 2, there were 2 centurions left on the board.
Turn 1 was pure karma: At the top of turn 1, my 3 LOS are outside 48 inches of the Relic Scorpius, so all he can kill with it are cultists as his assault cents hide inside the central ruin. In my turn, I move within 48 of the Relic Scorpius, and pick it up with a LOS's gatling cannon. I can barely see hidden assault centurions with just one LOS: only 1.5 of them is lost thanks to their 3+ save in cover. Turn 2 his beautifully painted Assault Centurions pop out of the ruin to make the charge, and the 9 devastator centurions arrive from deep strike. He's confident in his ability to kill a LOS in combat, so he puts fire from the devs into a backline LOS: not the one he was planning on charging. Takes it down to 13 wounds. The front one is at 24 wounds remaining when the opponent makes the charge with the smash captain and 5 assault centurions. I told him about the 3inch Aura of Acquiesence strat, and he barely has room to stay outside of 3 of the herald's heroic intervention range, but he does get all 5 assault centurions striking with full attacks. They do 15 wounds with 3 damage each. I make 6 invulnerable saves, and so I take 27 wounds.
MVP: The Stratagem Iron Within, Iron Without (1 CP):
"Use in any phase when an Iron Warriors unit is about to lose a wound. Roll a D6 for that wound, and each other wound you lose afterward in that phase. On a 6, you don’t lose the wound. "
So after the Assault Centurions did 27 damage, I rolled 27 dice, and I got 5 6s. The LOS lived with 2 wounds remaining. I then spent 2CP to interrupt combat so that I could strike before the smash captain does. When it comes to close combat, the LOS degrades backwards (4 to 6 to 8 attacks at lowest bracket— he angry!), so I had 9 attacks when charged, which is 27 dice when striking with the slash profile which gives you 3 dice to roll for each attack. 6s to hit explode into an extra hit (Daemonsmith). 6s to wound explode into an extra attack (Crimson Crown), which is 3 dice per attack. The smash captain did not get to strike that day, and there were no more assault centurions. In my turn 2, the 3 LOS lumbered towards the center, and shot the dev centurions in front of them. 2 DevCents survived, and I decided to not charge them to avoid dying from overwatch, so my 3-wound LOS charged the now-exposed chaplain. The opponent did kill that LOS next turn with the DevCents shooting, but really rest of the game was moving up the board on cleanup, and taking all the objectives for a final ground control and a 33-17 win.
Deployment
Top turn 2: Hi centurions
What a paintjob
Game 5: Orks
Going second (opponent's decision, but I decided not to seize) on Vanguard
LOS alive on:
Top
Bottom
What happened?
Turn 1
2
2
All the smasha guns and mortals from some Shokkas
Turn 2
2
2
One LOS got knocked down to 13. I got lucky this turn: his dice got cold and I had gotten off my 4++ aura from the MOP and killed 4 smashas
Turn 3
2
2
Sort of hid one LOS and Spent CP on a re-roll and the 6+++s strat to keep the other one alive on 3 wounds
Turn 4
1
1
Final LOS runs out to charge final boyz squad
Turn 5
0
0
All that's happening is character skirmishes: Warboss kills Daemon Prince, then on my turn the Herald of Khorne counter charges to get the warboss
Turn 6
0
0
He shoots the Herald of Khorne off the board, engages the cultists and MOP with Mek and Weirdboy
I played a lot of good players, and this guy especially was an exceptional opponent. I found out later that he was in the top 20 or so in worldwide ITC ranking, and yeah it showed.
Strategy: I was beginning to feel like I was getting the hang of playing the LOS list going second: place the white decoy LOS aggressively enough that it has to be dealt with, but don't weep when it dies cause I didn't have the points for the Gatling on it. I can always use defensive stratagems like Dour Duty to reduce AP by 1 so that lootas are AP 0 (hehe evil laugh) when they target the red LOSes in the back. So I want to go second.
This is mission 5, which is a bit different than most ITC missions. The objectives are basically in the 4 corners of the board. You don't get much benefit from holding the middle. At goldensprue I had lost in this mission to Chad, a talented Necron player, by playing too aggressively and being out-maneuvered when I charged up the board at him with a LOS: he just da-jumped (well, veil of darkness + Night Scythe Teleport) from his corner ruin to the exact corner I had come from 5 turns previously! Outside of sight in my own starting ruin where he blew away cultists and took my priority objective! Ouch!
So, my strategy was not to charge forward, but just try to hold the two objectives in front of me (and follow Archon Skari's advice to turn a Vanguard deployment into a hammer and anvil, and move a ITC objective that isn't in your deployment zone as your priority objective). I would ignore the Shokk guns and put aside any dreams of making it into the opponent's deployment zone. I picked a central objective, in the upper left, as my priority objective and pulled it out of any magic boxes and towards my deployment zone. The opponent thought it was a weird move. It's true that it would be now easier for him to get boyz or grots onto it and get the bonus. But in the end, having it closer to me and out in the open allowed me to guarantee hold more for 2 turns and hold the same for the rest of the game: so when all was said and done I gave him the bonus once and gave up 1 point to get many more. Secondaries: Butchers Bill, Reaper, old school (should have maybe picked engineers instead, but I was afraid of Da Jump).
Sunmary: I played to the mission here. Each turn, I asked myself what do I need to do to get kill more and hold more. This meant I sometimes wasted a Gatling cannon into a unit of 10 grots who were the only things holding an enemy objective, or getting too close to mine. This gave me kill more & hold more the first two turns, and the opponent never held more for the game. I also had a critical success in the first turn when one LOS charged 30 Boyz and picked them all up thanks to rolling enough 6s to hit and wound.
MVP: Master of Possession survives the whole game after protecting and buffing the two LOS survivors, gets me a kill on the last turn when its only him and 6 cultists left in my army by throwing a krak grenade into a weirdboy. All I have left at the end of the game are 6 cultists and the MOP. Close second MVP: the daemon Stratagem to turn a perils into a 2D3 perils denies my opponent Da Jump when it kills his weirdboy who rolled a 9 + 3 on turn 2. Uncertain Decision: I made a strange move turn 3. It was either masterfully dumb or great and I really can't tell which. I had 2 LOS left, one at 13 wounds, one at 3, and I really wanted to keep them alive. He had brilliantly moved blocked me to keep me out of his deployment zone by advancing up with a line of grots, protecting smasha guns, warboss and support characters from being charged while the last unit of 30 boys had a chance to slowly advance up the board after I had killed their source of Da Jump. I could either try to hide my Disco behind the middle ruin (probably out of sight of the smash guns, but not the shokk attack guns), or charge the grots. I went for the charge, and aggressively moved the Disco up the board on my consolidate to make him a clear threat: only 18 inches away from the big 30-boyz squad, and 10-15 or so inches away from smasha guns and other critical characters. His turn: he rolls a 6 for the boys' advance. Uh-oh: they're a 7inch charge from the Disco now. He doesn't put that many guns into the Disco: he kills one LOS and gets the other one down to 9 wounds. He gets the charge off on the Disco with the boyz and warboss, and kills him in combat. Basically, I've sacrificed this disco. Was it worth it? My turn: the LOS, realizing his last moment has come, charges out into the open and engages the 30 boyz in combat. There are no boyz left at the end of the fight phase. the LOS dies to shooting on the opponent's turn, but at that point I'm happy because I've wiped out all the opponent's troops, leaving him with a warboss, big mek, and weirdboy coming up the field towards me. By killing the boyz I've probably denied him the ability to either hold more or take my priority objective away from my cultists. The LOS were always on a clock, and so what moving the disco out as bait did for me was bring those 30 boys up into its range of attack before it clocked out. In retrospect, it was a trade, but I'm not sure if that's how I was thinking about it at the time. Please let me know in comments if I could have played that better.
LVP: Herald of Slaanesh. She goes aggressively up into a building to modify her line of sight to see over grots and get a cheeky smite into Lootas, killing 2. Hero! Then, the 10 grots, over whose heads she had smited, moved into sight, and shoot her with 10 grot pistols… and killed her.
Opponent's turn 3 move-blocking
End of game
Post-game recap: I felt good about this: I felt like my opponent's clean playing and meticulous move-blocking had elevated my playing as well. It wasn't a blowout win, it was a cagier game that went 28-23. I felt like I had played one of my best, and then looked under the table and saw that I had left my 10 brimstones in deepstrike!!!! $%^$@!
Game 6: AdMech
Going Second (Opponent's choice: I was seized on!) in Search and Destroy
Damage from Kataphrons and all the admech tanks. Knight takes 7 off a second LOS
Turn 2
2
2
(he targeted the Disco! hahaha oh no I rolled 5 1s on my 2+ saves now the disco lost 9 wounds even tho he's hidden and he's dead from indirect fire). Other LOS is down to 13.
Turn 3
1
1
There's one LOS left but he can get into combat. Let's go.
Turn 4
1
1
The LOS kills a Scorpius and all the Kataphrons
Turn 5
1
1
The LOS is no longer threatened by anything
Turn 6
1
1
Final LOS acheives Butchers Bill, Kill more, Linebreaker, and Last Strike.
Strategy:
I remembered what Mani said: "You only want to go first against a list that could break your back". This was that list! He had so much anti-vehicle shooting, on top of which he chose a Knight’s relic, the Headsman's Mark, which increased all damage from the Knight against my LOS by 2, because they are titanic. I luckily was able to choose who goes first, and I chose myself. Secondaries: butchers bill, old school, gang busters
Search and destroy deployment really favors my “1 in the front, 2 in the back” strategy: the decoy LOS in the front is nearly 30 inches in front of the two in the back corner. The front one has a maximum of 30 inch charge threat range thanks to soulforged pact. So I deploy first. I expect my combat decoy stratagy to force him to deploy way back in his corner, but when it comes to his turn to deploy, I am speechless. He is not intimidated at all by my lord of skulls up in the front: he is placing almost everything toward the front of his deployment zone, including kataphrons right on his front line within 9. Of the middle. An Easy 2 inch charge from the Lord of skulls. What is he doing? This guy is right on the frontline and is getting all his 24inch guns in range. My “decoy” Jedi mind trick has totally failed, it’s almost as if he knows he’s gonna ... SEIZE THE INITIATIVE! There’s the 6! Hold on boys, we’re in for a wild ride.
Summary: Oh how can I describe this game....like hanging on by the skin of my teeth on a roller coaster ride. Used every defensive stratagem available to me, to give the white LOS a 6+++, then reduce AP onto the red LOS that he started shooting after the white one died. It felt like a classic Tabletop Tactics Matchup: Admech vs Chaos, I’m the Iron warrior Beard taking on the imperium’s gunline, but instead of facing Stig the Tame Wargamer, I’m facing Andy the Unleashed Wargamer! Strategy: do everything I can to kill the TitanSlaying knight. All it’s weapons have +2 damage against titans, and I have 3 Titans. At least I only lose one LOS turn 1: because I’m touching cover and more than 50% obscured, I have a 2+ cover save. His guns are only -2. With the Dour Duty strat, I can reduce his AP by one: I now have a 3+ save against his Gatling and battle-cannon. I only take one wound from each! That’s 4 damage from the Gatling and 3 from the battle cannon, and the missle pods whiff. Phew....I then take risks: I put one LOS completely into the knight, and take him down to 12 wounds (use Tank hunters to reroll all wounds). I then know I need to both kill the knight and blunt his offense, so I make a risky move: I split fire with the second LOS and put the Gatling into the knight, and the ichor into kataphrons. The str 7, ap -4 is just so much better on kataphrons than the T8 knight with a 4++. It works out: the knight dies from the Gatling alone, thanks to Daemonforge for the re-roll wounds. Ok, the knight is down, I’m back in the game! Onto turn 2. I Lose my disco turn 2, and one LOS is now down to 13 wounds. His kataphrons are fortunately mostly out of range so they just advance up. At least that part of my castle in the back strategy worked to put him out of position. The main Issue: I had to fight to survive, meaning I had to put all my shots into his most alpha unit. Example: turn 1 putting everything into the Titan-killing knight. Because of that; I was giving up hold more and kill more every turn til I could turn the tide. Turn 2: those Kataphron Destroyers have got to go; they’ll be in range next turn. I put everything into them, kill them and wound a floaty. I then make a critical decision in the fight phase that goes poorly and could have maybe tipped the tides. More on that later.
LVP: forbidden gem on my herald of Slaanesh was a total waste: I burned two cp for it and didn’t get to use it: she died from a rogue dune-crawler in my backline‘s shooting, otherwise I could gave gotten in her into combat in the final duel with cawl and the DP. I should have shot that Dune crawler instead of letting it go, but I needed kill more so I shot wounded things instead.
MVP: Well that final LOS took out half the enemy list, but I have to say my Daemon Prince was the MVP. Their Daemonsmith aura helped the LOS take out many enemy targets at range, and every turn the DP lost 2-3 wounds from the Arquebus snipers: my model is a little taller than normal and there’s nowhere to hide them. This prince also was given the Fleshmetal Exoskeleton: an Iron Warriors relic that grants them a 2+ save and healing a wound a turn. By the time Cawl executed the Prince in the middle of the board on turn 6, this prince had already healed back 5 wounds, and taken ten. Opponent’s MVP: Daedalosus! That 50 point character held the middle, gave + 1 to hit against my LOS for many turns of the game, and then took three wounds off my Daemon Prince in overwatch when I came for him turn 5!
Path to Victory: I was just scrambling to stay alive turn 1, and I was burning CP left and right on Iron Warriors defensive strats. I had to make a lot of tough targeting decisions: I think I made the right call targeting his titanslayer knight turn 1 and removing it. It ended up being a 24 to 29 loss. I could have gotten one more secondary point, I’d I had taken Big Game instead of Oldschool, but that wouldn’t have made much of a difference. In retrospect, there was one move I could have made to take back the game: on turn 2 I deepstruck my brimstones, arriving 9 inches from his gunline, and 9 inches from the center of the board. If I can make the charge, I can shut down the shooting of 2 Dunecrawlers and one unit of Kataphrons, and take the middle objective, getting hold more. This would have been a two point swing and kept an LOS alive. I had the option to declare a charge on the dunecrawlers, and take overwatch, which probably would have killed the blue horror, turning it into a brimstone horror, and giving me only a 6inch charge... but I chickened out: I didn’t want to lose the brimstone squad to overwatch, because that would give him kill more. I instead only declare a charge through the wall on the Kataphron Breachers. I need a 9, but I roll a 7 on the charge: I would have made it if I took overwatch. I did the math later and even with Cawl’s rerolls he likely wouldn’t have killed more than 4 brims in overwatch, and I would have lived. That was the play. I missed the boat.
Deployment
Turn 1: Castle Up
Turn 2: Board is crawling with Admech
Turn 4: LOS on a breakaway
Turn 6: Final Duel
Memorable moments: my opponent suggested to me secondaries that were much better than the ones I picked. He's like "Remind me: so you took big game hunter and kingslayer?" Me :"No, but I wish I had now!". Also, my opponent was such a gentleman. I had measured out my deepstrike and put dice down where the brims were supposed to go turn 2; then went back to finishing moving other units. I went on to psychic phase. He asked: “did you mean to deepstrike the brims? You said you were gonna and I see you measured out their zone. Even though you’ve gone into psychic and have cast powers, it’s ok with me if you drop them cause It was your Intent”. This guy is the hero the imperium doesn’t even deserve.
Tournament recap
Tournament-wide MVP: Castle then Breakaway strategy. Also, the defensive strats that the Iron Warriors have access to to keep you alive turn 1 are fantastic. Thank you GW for defensive buffs instead of offensive ones.
Tournament-wideLVP: Disco... but not really. It died early in all games: people are scared of them and spend effort dealing with them. Great Distraction carnifex: it's only really useful in matchups with minuses to hit, like eldar flyers and Possessed bomb with -4 to hit Disco. The +1 to hit is nice, but the math on 3's re-rolling 1s and 2s (with daemonforge strat) and 2's rerolling 1s (with disco) is pretty close thanks to the fact that 6s explode (with daemonsmith), and in the former case you're more likely to get a 6.
True LVP: Cultists. I brought them for the battalion, for CP, cause I didn't know what to expect out there in this crazy meta and wanted stratagem options. The gave up kill more for several games, and weren't durable enough to hold objectives. Also, the soulforged pact was a bit of a waste of 2 CP: the extra move only mattered if I went super aggressive turn 1, and game 2 is the only game I used the advance and charge strat: and the disco failed his charge despite getting to advance 3 inches. I would probably drop the cultists in the future and turn the Iron Warriors battalion into a Supreme Command with a warpsmith, or upgrade brims into nurglings
Random Rules Questions that came up:
Can I get cover from this thing that looks like a hill but is impassible terrain (LVO had a lot of these rectangular terrain pieces)? No.
Can I heroically intervene without ending within an inch? Yes, as long as the move is closer to the closest enemy model, you don't need to intervene to get within an inch
Can I shoot this model even tho it’s base is visible and the model Is not? Yes, this was an LVO-specific ruling
Can I heroically intervene with fly, i.e. move over models if I have the fly keyword? Yes.
A lot of other great moments happened that weekend at LVO. It was a great first time there, and I plan on going back again. I got to play a whole mix of top armies and top players. Thanks to my friends and teammates for the support!
Last year I had to stop the blog writing unfortunately as I had too many irons in the fire. Last summer a few things hit at all at once- I had bought a fixer-upper home that needed a bit of TLC/ updating, had to get knee surgery due to an injury and was tasked with helping to write an additional curriculum for the school. Although I will argue that my hobby skills have been suspiciously handy with home repair and renovation work. All in all, things were pretty busy and unfortunately my ability to spend time on the hobby pretty much vanished- but I was able to attend three big events in the North East/ run two small RTTs through the local game store (Flipside Gaming).
The hobby station that I have nearly finished building up at the house. Almost ready to rock & roll here.
The Hobby in 2019:
I was never able to get my Custodes army all done until December & the Portal GT. At the Battle for Salvation (in October) I was able to take home the Best Conversion award (which was awesome) for my heavily converted Shield Captain on a Dawn Eagle Jet-bike. It definitely felt good to walk away from the first GT of the year with a hobby award. The second GT that I attended this year was Da Boyz GT. I was able to win the Best Table award for bringing one of my tables of terrain to the GT (this is something that definitely want to do more of next year). After Da Boyz GT I made a concentrated effort to get my Custodes wrapped up for the Portal and I was able to get it fully painted just a day before the tournament. At the Portal I was able to take home Best Painted/ Hobby which was a fantastic way to end the competitive season for me. I cannot stress how fantastic these three events are. It was my first time getting down to the Battle for Salvation and cannot say enough about how well run, and fun of an event it was. Something that I will be attending next year for sure. Da Boyz GT and The Portal GT were extremely well-run events as well and was my second time attending for each. I’m looking forward to going next year!
The Custodes army at Da Boyz GT (Army was almost done!)
I’m very happy and proud of the work that I was able to get done with the Custodes over the course of the fall/ winter. Winning Best Painted at the end of the tournament series really helped end the year for me on a great note.
While I was doing a pretty solid job with the hobby, gameplay wise I was floundering a bit. I had a tied record at Salvation (3-3), but a losing record at Da Boyz GT (2-4) and a sad showing at the Portal (0-5). I was trying to practice with the army and was making some adjustments between events to the lists, but the Custodes simply didn’t have the tools to deal with the newer armies/ powerful lists that I was running into. I decided to change it up and go with a new army with the start of the new year.
#thestruggle
A New Army for 2020:
A test model for the Blood Ravens. Looking at adding greenstuff and the chains to the models for conversion work. I'm making an effort to convert/ add additional details to all of the models in the army.
I decided to go with Space Marines- Blood Ravens for the new year (I know-super original). I was pretty disappointed with my gameplay wise with the Custodes and I’m hoping that going with a more competitive Space Marines army will help me win a few more games. With my high sportsmanship and hobby scores, I’m hoping to take a Best Overall award at some point in 2020. This painting blog is going to focus on my efforts to convert and paint up a Blood Ravens Space Marine for competition.
I'm looking forward to posting a bit more moving forward. Here is the link to the direct blog:
My thoughts after a lot of play testing with Necrons both prior to Chapter Approved 2019 and after is as follows for those interested.
Overall Necrons want a Battalion and possibly two additional specialized detachments (Outrider/Spearhead in most cases) to max CP count. Getting cheaper HQs which are most of the time a tax that only fills a support role in the army is very good for ensuring you can get a little extra muscle in there. Necron Lords and Overlords specially look very compelling to fit these requirements.
For starters i think you always want a solid anti tank weapon or several. Doomsday Arks x3 or nine (9) Heavy Destroyers seems the best suited to me to guarantee you can pack a long ranged punch. Due to the nature of Necrons most of the time you are stuck at midrange.
The outrider is where you really have the most flexibility and houses many of Necrons best units. If you want to gear towards Destroyers, Wraiths, Tomb Blades this is where you want to finalize that selection to determine the rest of your list.
An alternative to this Outrider Detachment is the triple Doom Scythe Airwing which was popularized by our very own Christopher T. However I don’t think that detachment is a must as the other options are solid options as well. What I think the Airwing detachment does very well (better), is dishing out a ton of mortal wounds. Most armies just don’t want any part of that, but I feel that’s a one turn gimmick that can fall apart if one flyer is dropped Turn 1, which is very likely against most opponents.
Alternatively, I have been putting serious serious play testing time with C’tans and for the most part found it to be very successful when properly supported. Without good support they perform worst than every other option mentioned prior. However with regards to tossing mortal wounds at your opponent they are the best option superior to the Airwing even as they are more difficult to take out in a turn or two and can hit single targets as well as blobs and castles. Yes I am advocating for C’tans post-CA they are a very respectable option for this interchangeable slot.
How many Ctans? That’s the next question i assume everyone would have. For starters always take the Deceiver if you have room for a C’tan he is the number one draft pick because he gives you flexibility while still carrying out the main roll of mortal wound spitting just as good as any other. Secondly if you are taking more C’tan take four (4) total (the Deceiver plus three others) this maximizes your powers. Tested it enough to confirm its either one or four no in-betweens if you want maximum carnage.
The Battalion should be the last thing you fill out specifically the HQ sections of all detachments should be our last concern, as all HQs are there for support in most cases and are very interchangeable so accommodate them so they play their role while allowing the rest of your actual army to do it’s job.
Greetings! Tim the Enchanter here with a review of the Da Boyz GT in Rochester, New York, just South of Lake Ontario. The 40k GT was a tremendous event and saw over 100 players from the United States and Canada battle it out. I’m definitely going back next year, so let’s talk about the tournament itself and accommodations before going into my games.
Hotel and Event Space
The tournament took place at the RIT Inn and Conference Center. It’s always luxurious to show up to a multi-day event and never have to leave the premises. Thanks to a friend, I had a pushcart for the first time and couldn’t have been happier pushing my cart from hotel room to ballroom. The food at the hotel was solid, but I think next year they should keep the bar open later as at least in my group there were some drinkers ready to spend money but unable. The ballrooms with the tables were nice and had enough space to room around. Also, so many gamers signed up that there were too overflow rooms. I had two games in the overflow rooms which were extremely comfortable with only 6-8 tables in them.
Terrain and Terrain Rules
The terrain at the event was the best I’ve ever seen though I’m relatively new to the competitive scene. The tables were stocked and varied. I played on a typical ruin table, a table with train tracks and an actual train pulling 3 leman ruses, as well as a forest table. I saw tables with churches as large as ¼ of the table and a Xenos world that had an enormous piece in the middle. The team really went above and beyond on terrain. We do need to talk about the terrain rules for a bit. The event was not using ITC rules. It used true line of sight, which bit me hard in game 6, and many of the “box” terrain counted as transports. Each table had an index card that spelled out the terrain and the transport capacity of each “box”, along with the toughness, wounds, and save as the “boxes” could be destroyed. What that meant was on certain tables I could deploy all of my plaguebearers into a 30-man box and they couldn’t be shot until the “box” was destroyed or they came out. I think the ruling was an interesting twist, but I’m not sure I like it better than first floor blocks line of sight. Then again, I dislike “magic boxes”, so this ruleset was an improvement.
Scoring
Quickly, it was ITC primaries up to 30, plus maelstrom secondaries up to 15, 5 points of tertiaries for a total of 50 points. The player pack is on their website if you want to read through in detail. I practiced with maelstrom and it took me longer than usual to sort out the cards and what to do,but was a nice change of pace. I still likely prefer ITC secondaries but mixing things up is never bad.
The List
I’ve been running mixed Chaos all year and wasn’t going to change as my only other army is Orks and outside of 18 smasha guns, they are having a tough go of it. I wanted to bring something with a lot of command points as well as high toughness targets with good saves plus lots of mortal wounds. I figured I would see a lot of space marines and wanted to be wounded on 4s or 5s as much as possible as well as be able to ignore the plethora of cover save bonuses they get. The relics listed I took every time, and I kept the powers I took most of the time though I did mix those up depending on the matchup.
Magnus the Red [23 PL, 445pts]: Bolt of Change, Doombolt, Infernal Gaze
Start with 13 CP – 2 for Relics = 11 pregame
++ Total: [117 PL, 2,000pts] ++
For those unaware, the impossible robe gives you a 3++ and incorporeal form gives you -1 damage to a minimum of one. So, the Lord of Change was very hard to kill, especially against things like disintegrator cannons. From there, Magnus can get a -1 to hit and a 3++ also. And if I’m lucky on my Boon of Change roll, he could be Toughness 8. So, two big baddies with 3 up invulnerable saves. Then I could deep strike the blood thirster for two command points leaving you the choice of shooting the big guys or the plague bearers who were often -2 to hit and could warp surge to 4++. Lastly, is Ahriman and the princes hiding behind the plague bearers, dishing out mortal wounds and buffing Magnus. That’s the list, on to the games!
Game 1
Game 1 I played an honorable gentleman running Morty and Magnus at his first GT. I played Morty and Magnus for part of this year, so know the tricks. Plus, I had more bodies to stymie his big guys. The game plan was thus to hide behind all of my chaff and wait for the smashing. To his credit, my opponent initially played cagey and did not come straight at me, but it quickly became clear that he couldn’t sit back. I destroyed his small plague bearer unit in my turn 1 after he went first and then jumped on the relic which was the bonus point that game. He eventually was able to charge his Morty and Magnus together, but I had screened with cultists and the Lord of Change who was expendable. I think the LoC was death hexed, but regardless, he died. That left Morty and Magnus open for a counter charge where the Bloodthirster smashed a death hexed Morty. My opponent followed up my killing my Magnus with his which was followed by the Bloodthirster doing work again and killing a not death hexed Magnus. At that point it was turn 4 or 5 and he had Ahriman and a unit of nurglings left. I did not try to maximize by score here in order to stay near the middle of the pack and ended up winning 38-20.
Record 1-0
Game 2
Game 2 ended up being against another player from my club which is a bit unfortunate to meet so early on. That said, I appreciated the game because we played without a clock and it was friendly throughout. He was running a mechanized eldar list that had flyers, wave serpents, and night spinners. I’ve played versions of this list before and it’s not a great matchup against my list. All of my heavy hitters can fly, so between assault and mortal wounds, the minuses to hit that these lists rely on mean nothing to me. I went first and a super Magnus smite that did 11 mortal wounds to a night spinner really set the tone. While he was able to down the bloodthirster in his turn 1, I now had a buffed-up Magnus running around the board smiting and smashing things. We ended up swapping deployment zones as he moved wave serpents across the board to prevent getting “boots on the ground” called. I mainly ignored the flyers unless one got too close. It was still a tight game most of the way, but I ran away with the points in the end to 31-18.
Record 2-0
Game 3
Going into game 3 I was feeling good. I’d never won my first two games at a GT before and I was playing another eldar air force. This one had nightwings instead of razorwings which is a subtle twist, but one that mattered against me as he was wounding my big fellas on 3s and doing D6 damage instead of wounding on 5s and doing 2. My opponent was a really nice guy and we bought each other beers during the game. I need to mention the clock though. We played with one and he was very quick to clock it over to me. Including clocking it over to me for one or two saves. While I suppose that is fair, it makes for a much more tense game and we ended with more than enough time to play 6 rounds despite having a 5-minute rules debate with the TO.
Anyways, I went first and I think I made two mistakes off the bat. I didn’t deepstrike the bloodthirster, though I didn’t know I would go first when I had to make that decision. And second, I kept Magnus in the plaguebearer and character bubble. In retrospect with the bloodthirster on the board, he was the obvious target over a buffed Magnus, so I should have slingshotted Magnus over into my opponent’s deployment zone. I may have even failed to get a kill as I believe I left a ravager on one wound. On his turn 1, he downed the Bloodthirster which was the correct move. Then we continued a back and forth game taking lumps out of each other until his turn 3. The key to defeating any list with big units as eldar is Jinx and Doom, but mainly the first one. Crimson Hunter Exarchs have Doom built in against flyers, so Jinx is all you really need. I had failed to get Glamor of Tzeentch off in my turn but did get Weaver of Fates. In comes the Jinx cast, and even though Magnus is there to deny, and I’m certain I used a command point reroll, it went off and Magnus was back to a 4++. From there, it was a shooting gallery that took every last bit of my opponent’s shooting to kill him. If Magnus had survived, and he certainly would if I still had the 3++, I would have heroically intervened into a ravager and then proceed to heal Magnus and kill more in my turn. I can’t guarantee that is enough to win, but it certainly would have ended up much closer. Final score 38-26 him.
Record 2-1
Game 4
First thing to know about game 4 is that we played 4 games on Saturday, so at this point it was around 7 PM and I’d been playing 40k since 8:30 AM. Surprisingly, I had a lot of energy still. I think because we only had a few beers Friday night. I was up against a Chaos horde list. It had a tzaangor bomb, bloodletter bomb, plaguebearers, flamers of Tzeentch as well as assorted buffing characters and casters. My opponent was friendly enough, offering me some bourbon, but clearly peeved that he lost his previous game. We had a good smash up, but with a triple battalion, he had more than enough troops to get hold more every round and it was a struggle for me to score maelstrom points as he pretty much had the board swamped with bodies. I was trapped in my deployment zone for the first 4 turns as wave after wave of daemons hit. I eventually broke out and killed them all, but by that point I only had Magnus and the Lord of Change left and not enough time to recover. If there were 7 or 8 turns, I could have won, but that’s not how the game works. Final score 38-25 him.
Record 2-2
Game 5
Game 5 was Sunday morning, so I got some much-needed rest the night before. I was up against an Imperial Fists list, but due to the list submission cutoff, the fist supplement was not in play at this tournament. My opponent was extremely nice and friendly. I deployed as far back as I possibly could while he went uber aggressive and deployed most everything on top of a terrain “box” in the middle of the board as it was search and destroy deployment. On top of that box were 6 devastator centurions, 5 aggressors, plus various characters. I knew right away that the kill was going to end quickly, so no need for a clock. He also had a drop pod with grav devastators in deep strike. He went first and didn’t move very much as he intended to kill Magnus. Before he go to shooting, he tried to cast a power with a psyker on top of the “box”, but rolled a double 1 perils. I asked him politely if he intended to keep that, he said yes, and then I hit him with the daemon stratagem that forces you to take 2D3 damage from perils. His psyker promptly exploded and inflicted a few wounds on the remaining Fists on his way into the warp.
At the end of the movement phase, he brought the drop pod down next to the “box” that the plaguebearers were in. That ended up being a game swinging decision. He was able to kill Magnus with the devastators in the pod and centurions, but in my turn, I popped the plaguebearers out of the box and tagged the drop pod with a single model. At that point, there was almost nothing left for him to shoot. Magnus was dead, the bloodthirster was in deep strike, the Lord of Change was hiding in the back, and all the rest of the characters were behind the plaguebearers. He charged his entire army into the plaguebearers in his turn 2, but between the -2 to hit after casting Miasma of Pestilence and warp surging in the fight phase to a 4++, I believe he killed 4 or 5 of them. What’s worse is that I rolled a 1 for morale and brought 3 of them back. Now that all of his stuff was in combat, I had no overwatch to fear and was able to get both princes and Ahriman into combat along with the Lord of Change. The bloodthirster charged two thunderfire cannons out of deep strike and made a 10-inch charge on one. On the other, my opponent decided to overcharge his plasma pistol, rolled a one, and the tech-marine died along with the cannon. From there, it was just a matter of rolling a few more combat phases and we called it in turn 4 with minimal marines left on the board. Final score 36-14.
Record 3-2
Game 6
Game 6 was yet another pleasant game. I didn’t have a single bad game despite the clock issues in game 3. In fact, I only ended up using a clock in games 1 and 3 as we forgot to turn it on in game 4. 4 of my games played 6 rounds and the other 2 were called in the 4th or 5th as it was clear I was going to win. In this game, I made a grievous mistake that was compounded by the maelstrom mission. In this one, you started with 6 cards and couldn’t discard any that you didn’t achieve. You could pay 1 CP to discard up to 3 though and one you were at zero, you got the draw 5, then 4, etc.
I was playing a third eldar army, though one much different than the other two. It was pure dark-kin and had planes, ravagers, talos, and venoms. He won the roll off and took first turn. In addition to the aforementioned mistake that will come up shortly, the true line of sight rules really hurt me here. I deployed all of my troops behind ruins, but because of various windows and doors that I hadn’t noticed, he could actually shoot at pretty much everything turn 1. So he proceeded to leave my bigs alone and pickup chaff. In this one, I deep struck the plaguebearers and the bloodthirster as he had more than enough disintegrators to kill the plagues. We then played a back and forth game that was tons of fun. I really enjoyed my opponent and we both let each other have take backs or go back if we forgot something. The bloodthirster made it into combat with a plane and proceeded to roll 3 ones to hit with a reroll out of 5 attacks and then 3 ones to wound! Not a single wound from the thirster. The command point I used for that reroll was my last one, which if I have stopped for a second, I would have realized that one of my maelstrom cards was secured objective 1 which was so far from the bulk of my army that I may never get it. Had a saved the cp, I could have spent it on discarding the card and drawing 5 new ones! As it happened, I now have to find a way to get on objective one or lose. Thankfully, I had a unit of brimstone horrors hidden not too far from the objective. We measured it out and I needed a 3 on an advance to steal it from a venom. Over two turns, I failed that 3-inch advance twice and never made it over to one, so never got to redraw cards. What a rookie mistake! Had I rolled a 3 or kept a command point, I would have scored that objective and been in prime position to win. As it was, I lost by two points 34-32.
Final Record 3-3
Being a blunder away from 4-2 (or a 5+ roll on Helm of the Third Eye!) felt solid. I had 6 awesome games and really enjoyed the experience. It would have been nice to play a lessor seen army like nids or necrons, but there was enough diversity between the armies I played that it wasn’t ever the same game twice.